Get ready to make friends with Notion subtasks. This guide is your personal walkthrough of 3 expert-approved strategies that can help you tackle anything from daily to-dos to big projects.
I’ve been using some of these methods to keep my work life in check, and I can’t wait for you to give them a whirl.
What We Will Cover
What Are Notion Subtasks?
Notion subtasks are smaller tasks that you can nest right under a main task. They’re your handy tool for breaking down those intimidating tasks into bite-sized pieces.
If you’re mapping out a project or just trying to make sense of your day, subtasks help you zero in and actually get things done.
The idea is to simplify that mega to-do list and make your workload feel less like a mountain and more like a hill.
Can You Do Subtasks in Notion?
You bet! Notion added subtask functionality in their December 2022 release. (1) This feature lets you create subtasks by simply indenting them under a main task.
You can now organize your tasks in a more structured way without juggling multiple lists or pages!
The beauty of it is that each subtask can have its own set of properties like due dates or assigned members.
Differences Between Notion Tasks and Subtasks
Let’s get into the nuts and bolts of tasks and subtasks in Notion.
If you’ve ever wondered what sets them apart or how they complement each other, you’re in the right place.
We’ll go over everything from how they stack up in a database to their unique functions and even how they look on your screen.
| Tasks | Subtasks |
|---|---|
| Hierarchy: – Appear first in a database hierarchy |
Hierarchy: – Appear beneath the parent task in the hierarchy |
| Function: – Represent broader objectives – Can exist independently |
Function: – Detailed steps to achieve the main task – Often need to be completed before the main task is checked off |
| Presentation: – Displayed as main items in your workspace |
Presentation: — Indented under main tasks – Can be hidden as toggles |
Hierarchy
In Notion, tasks are your main goals or to-dos, and subtasks nest right under them.
Think of tasks as the big picture, the stuff you need to get done. Subtasks? Those are the details, the individual steps.
In a database, the parent task will always appear first in the hierarchy and the subtask will be beneath it.
Function
Tasks usually represent a broader objective, something like “Organize a Team Outing.” Subtasks are the details that make it happen, such as “Reserve a Venue” or “Send out Invitations.”
And here’s the kicker: you often have to finish certain subtasks before you can check off the main task.
They’re like the building blocks that make sure you’ve covered all your bases.
Presentation
Subtasks are neatly indented right under your main tasks. It gives you that visual cue, helping you instantly know what’s a task and what’s a subtask.
But get this: Notion also allows you to hide your subtasks as toggles. That means they won’t necessarily show up until you click to expand them. I love this feature because it keeps your workspace clean and uncluttered.
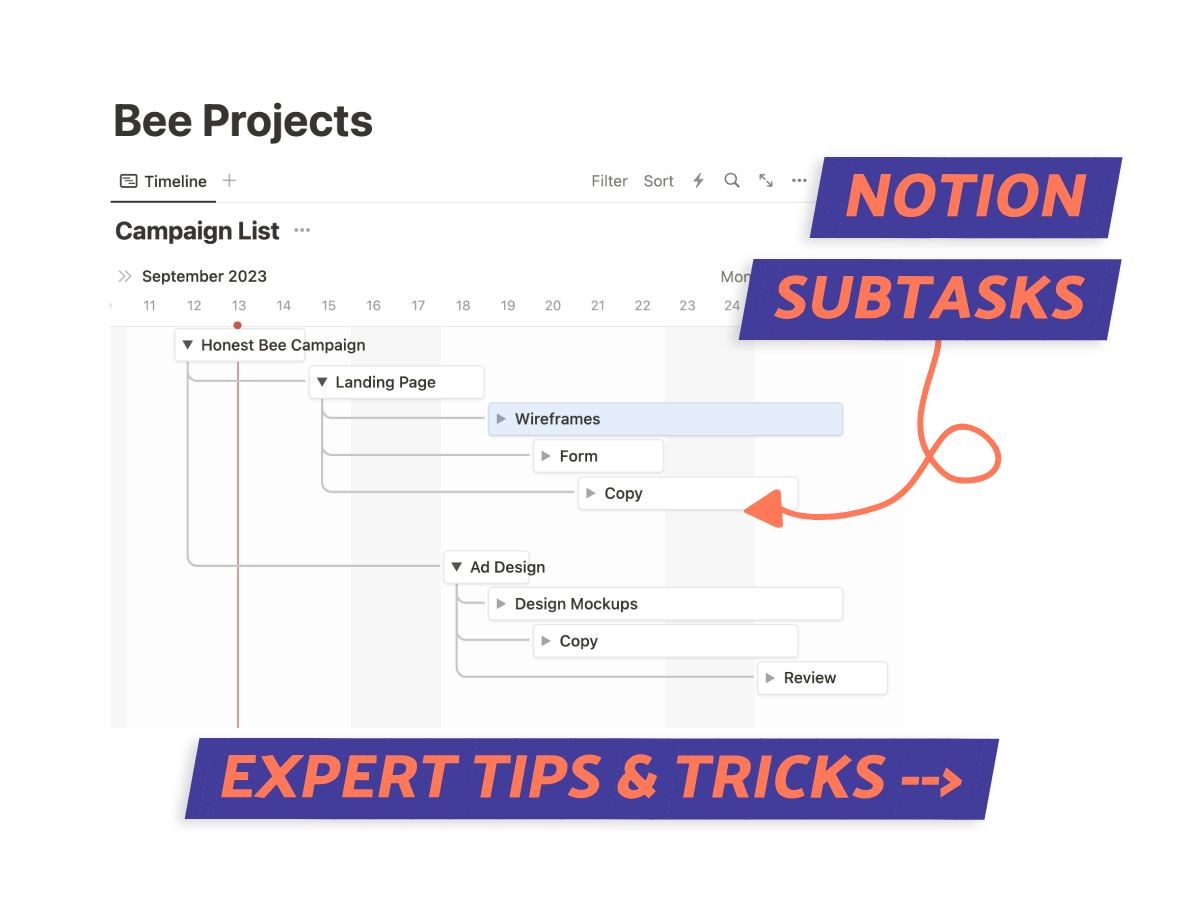
Now, if you’re using the timeline view, subtasks will automatically arrange themselves by start date. You get a sleek, chronological lineup of what needs to be done and when.
3 Ways Experts Are Using Subtasks (And How To Set Them Up)
Now that we know what Notion subtasks are and how they differ from tasks, let’s get to the good stuff.
I’m going to share three expert-approved ways to use subtasks, and even throw in a quick guide on how to set them up.
1. Subtasks Within Tasks Database
Having subtasks in a task database is pretty much the foundation of task management in Notion. It’s how most people use subtasks.
Let’s say you’re putting together an ad campaign, it’s more than just writing some text. You’ve got a landing page to design, an ad to create, and drafts to review.”
Creating a main task for the campaign and then adding subtasks for each of these mini-missions will help you keep on all the moving parts.
How To Step Up Substasks Within A Database
Let’s get deeper into the topic and set up subtasks in Notion task database to illustrate how it works.
It’s not rocket science, but knowing exactly where to click can save you some head-scratching moments.
Here’s a step-by-step rundown.
Step 1: Turn On Sub-items
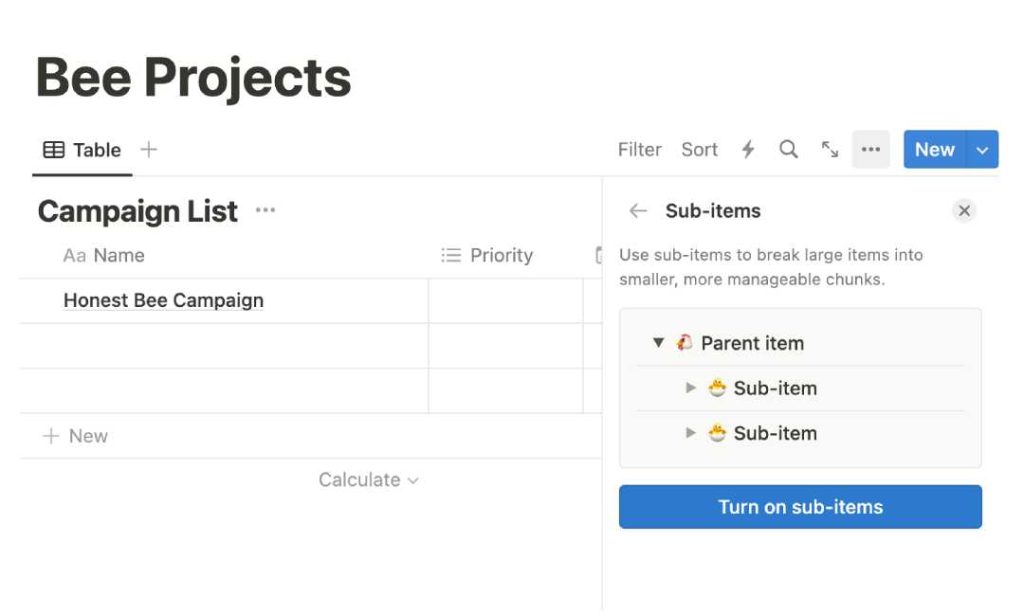
Open your Notion workspace and find your existing tasks database.
Look for the three dots next to the blue “New” button. Click them and choose “Sub-items,” then hit the “Turn on Sub-Items” button.
Doing this turns on the sub-item feature, basically setting up a relational database for your tasks.
Step 2: Hide Parent & Subitem Columns (Optional)
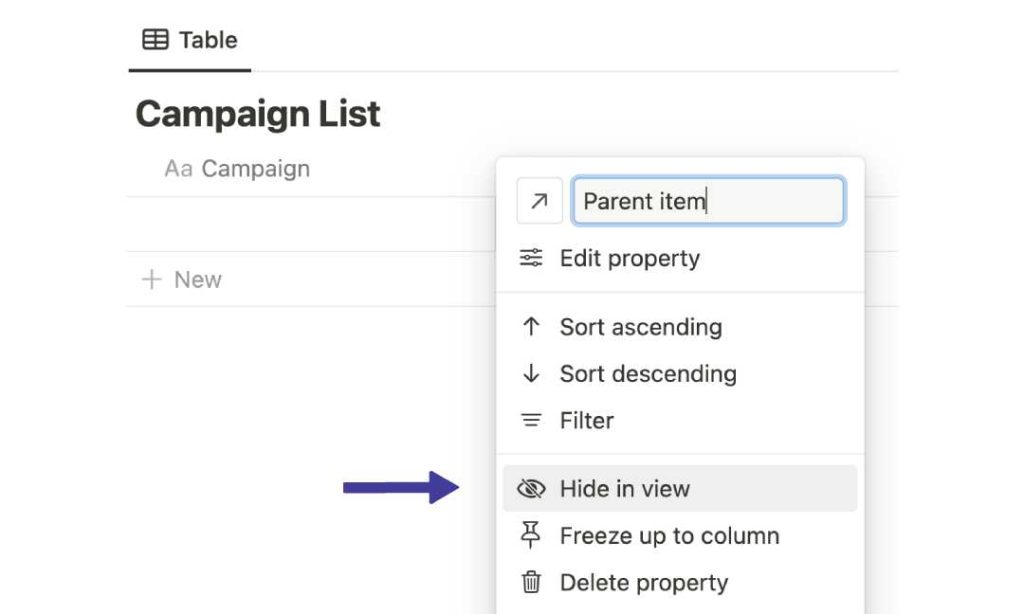
Immediately after turning on sub-items, two properties ‘Parent Item’ and ‘Subitem’ will be added to the database.
If you’re like me and prefer a clean workspace, you might find the Parent and Subitem columns a bit much, then you’ll want to hide it.
But don’t worry, you can always unhide them later if needed.
Step 3: Add Main Task
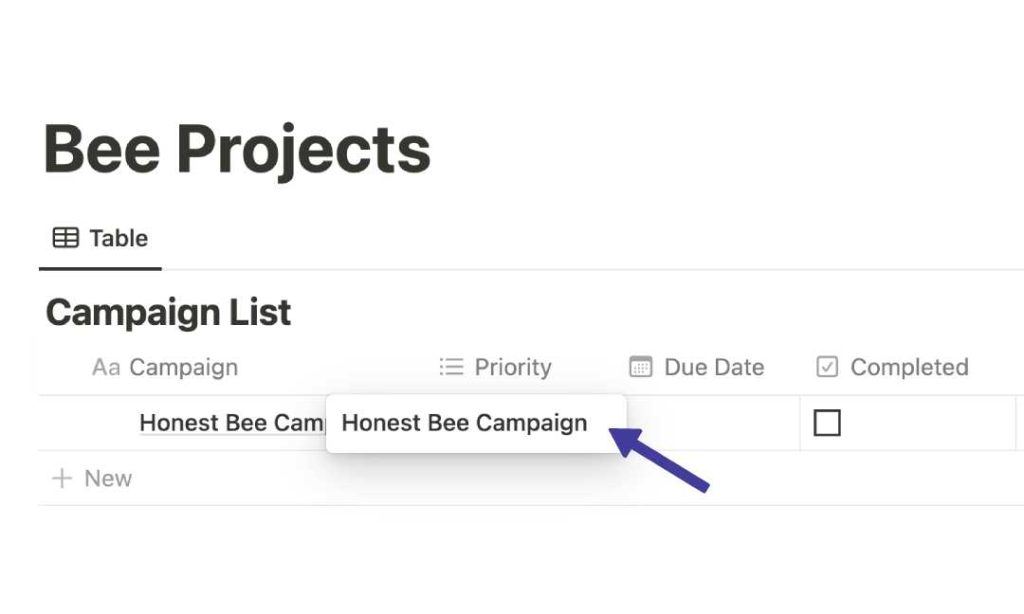
Now, insert your primary task into the database. This serves as your overarching objective, such as “Publish Blog Post” or “Organize Fundraising Event.”
Depending on your database setup, this could go under various column names. In my setup, it’s labeled “Campaigns.”
Plug in that task name into the database.
Step 4: Add Subtasks
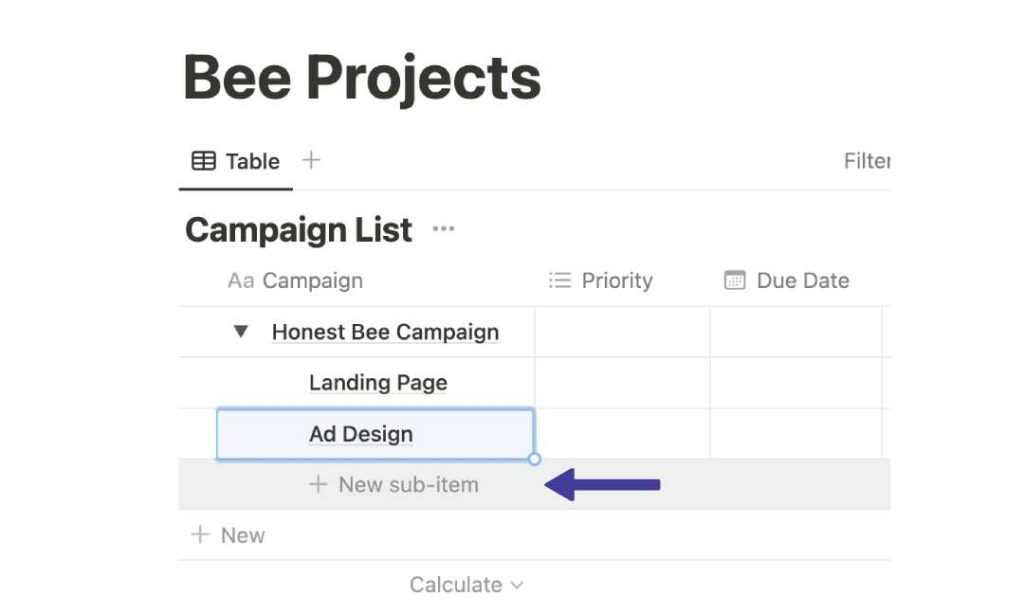
To break your main task into smaller tasks, click the toggle arrow to show the “+ New sub-item” button.
Click it to start adding your subtasks. This helps organize your main task and makes it more manageable.
For complex projects, you might need even more subtasks. Just click the “+ New sub-item” button under the same task to add more.
2. Notion Timeline Subtasks
If you’re managing multiple projects or facing various deadlines, Notion’s timeline subtasks can be incredibly useful.
Consider launching a new app. You have different phases such as brainstorming, coding, and marketing.
With timeline subtasks in Notion, you can lay out each of these phases along with their specific tasks on a visual timeline. It’s a practical way to keep your project on track.
How To Add Subtasks To A Notion Timeline
Eager to bring some order to your tasks and projects? Adding subtasks to a Notion timeline can really help you stay on track. Think of it as a roadmap for your projects, showing you each milestone along the way.
I’ll show you how, step by step, below. Here’s how to get started.
Step 1: Set Database To Timeline View
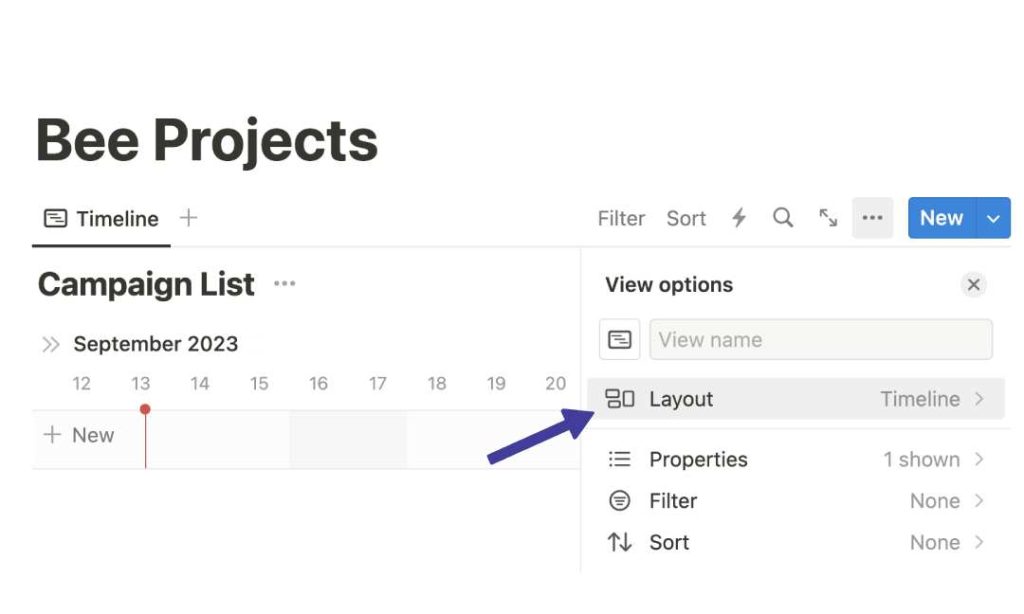
Open your Notion workspace and find your tasks database.
If you haven’t yet set up a timeline view, no worries. Just click the ‘+’ icon at the top of your database and select ‘Timeline’ from the layout options.
Step 2: Enable Dependencies
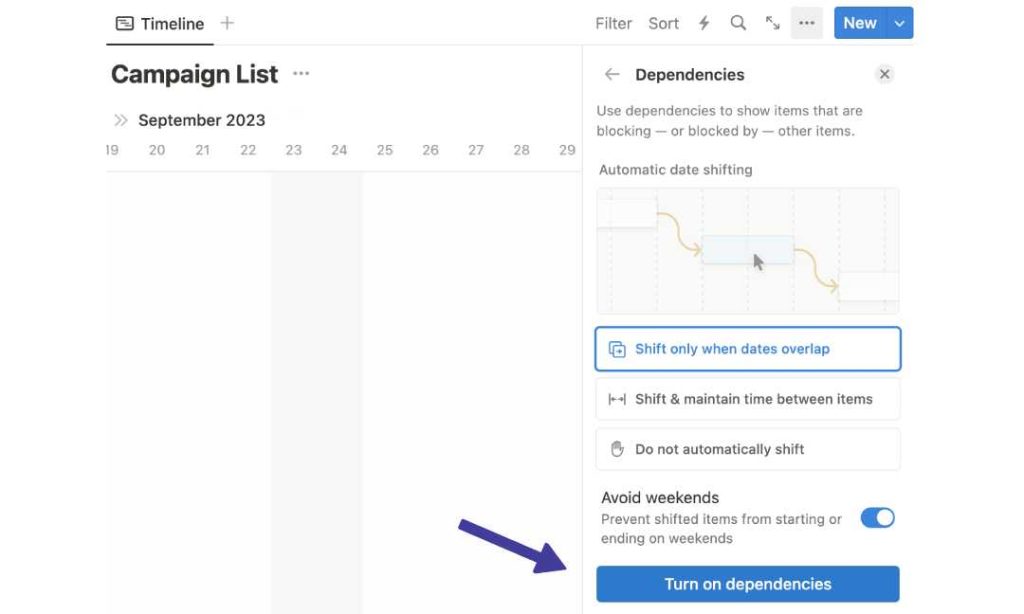
Now that you’re in the timeline view, it’s time to turn on dependencies.
This feature allows you to link tasks in a way that shows their relationship to each other. It’s a pretty neat way to see how tasks are interconnected.
Look for the three dots next to the blue “New” button. A list of options including “Dependencies” will appear. Click on it then turn on dependencies.
Step 3: Add Main Task
Next, click the ‘+New’ button in the timeline to add your main task. This is your central objective, the one that all your subtasks will support.
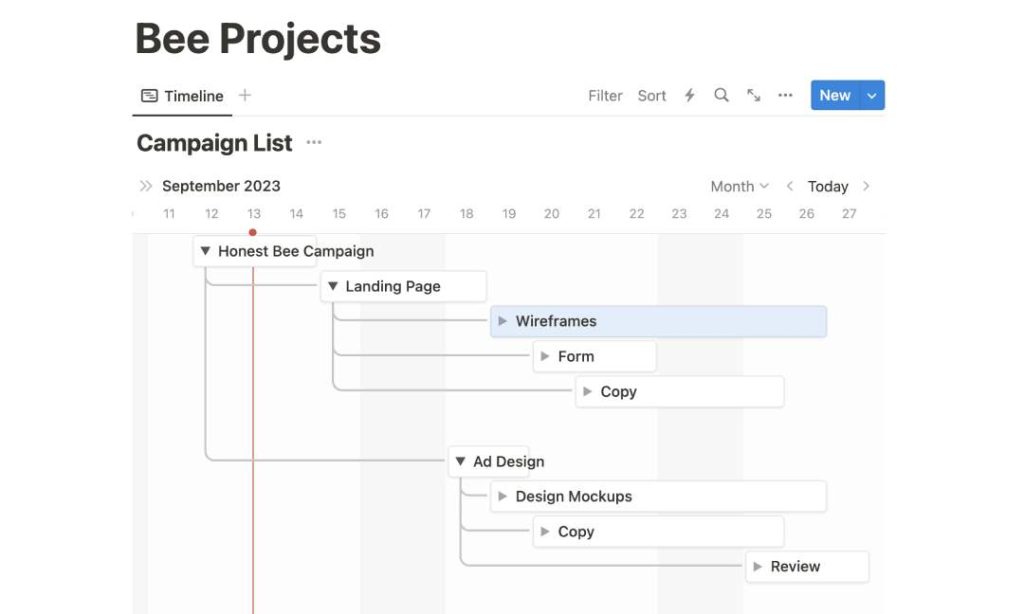
Step 4: Add Subtasks
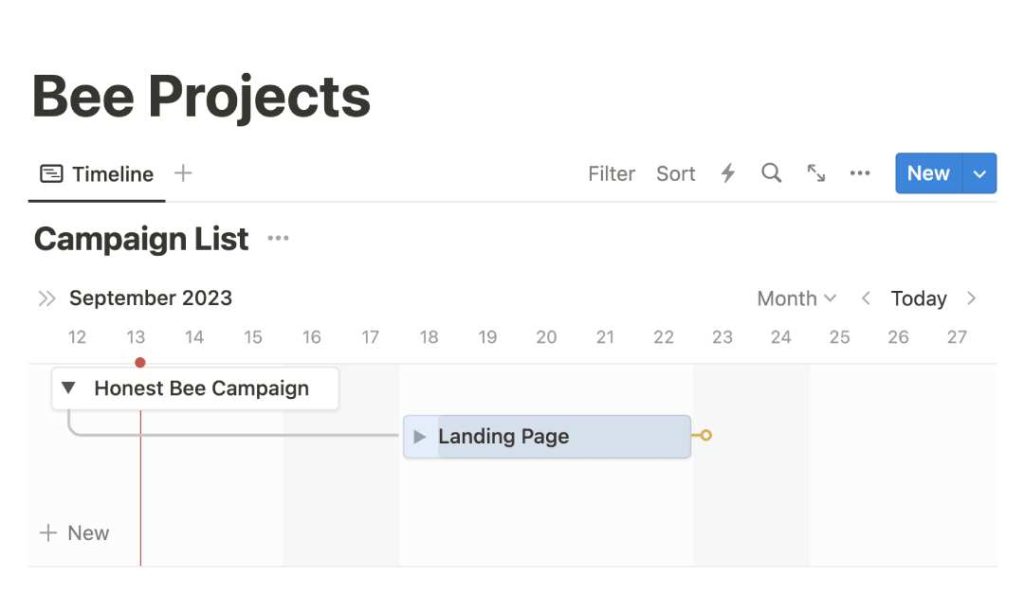
Find the toggle arrow next to your main task and click it. This opens up a space for you to add your subtasks.
Start listing the smaller tasks that contribute to your main objective.
Step 5: Chain To Add Dependencies
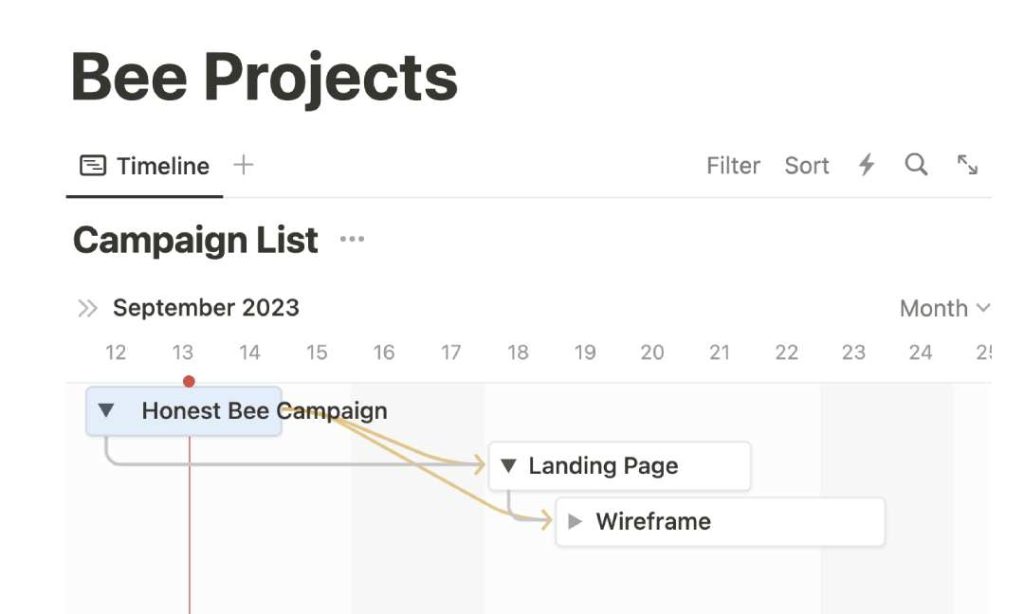
Last but not least, let’s link these tasks. Hover over your main task, and you’ll see a golden-colored circle on the right side.
Click and drag this circle to connect it to a subtask. This sets up a dependency, helping you understand the sequence in which tasks should be completed.
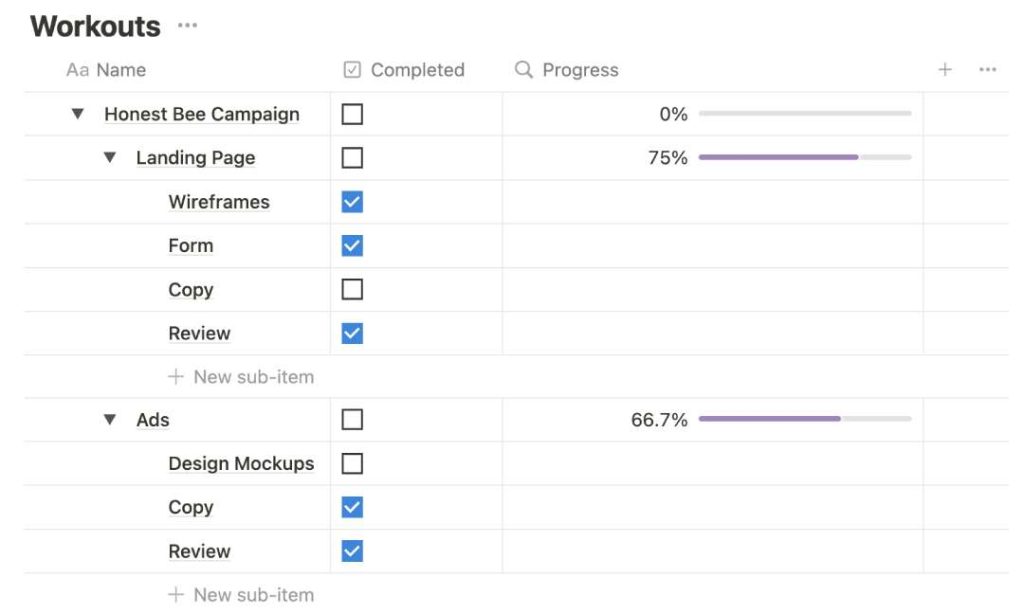
3. Notion Subtasks Progress Bar
If you’ve ever felt a bit lost tracking your project milestones, a Notion subtasks progress bar can be super helpful.
It’s a virtual dashboard that shows how close you are to crossing the finish line with your tasks or projects.
A progress bar isn’t just for show; it’s super practical. Let’s say you’re knee-deep in a project. It can show you how much of the project has been knocked out and what’s left still waiting for you.
It’s both a motivator and a reality check in one neat package.
How To Add Notion Subtasks Progress Bars
Creating a progress bar in Notion involves a bit of formula magic.
But don’t worry, you don’t need to be a math whiz to get it done. I’ll guide you through it, step by step, below.
Step 1: Create A ‘Completed’ Column
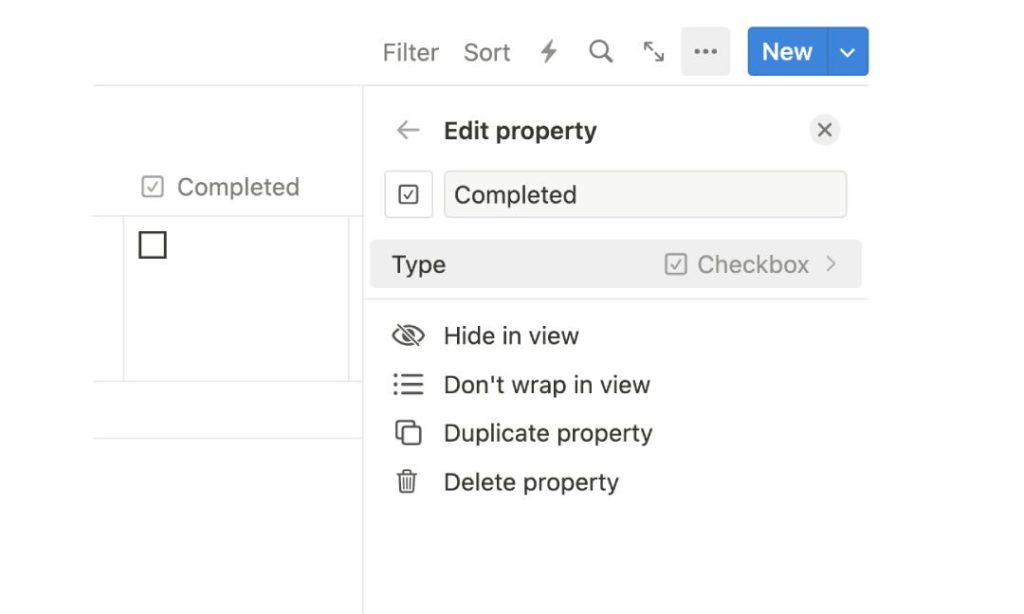
Let’s start by adding some columns to our Notion database.
The initial column you’ll want to set up is called ‘Completed.’ This is where you’ll mark off tasks as they’re finished.
Make sure to set the property type to ‘Checkbox.’
Step 2: Add ‘Progress’ Column
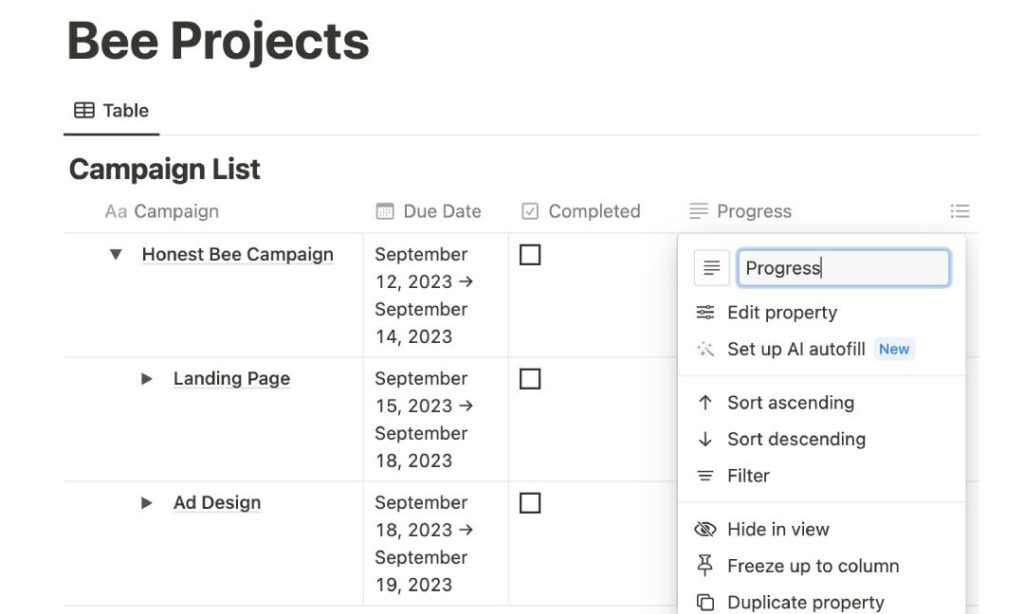
Next up, create another column and name it ‘Progress’.
This is the spot where you’ll keep an eye on how all the subtasks for your project are coming along.
Go ahead and change the column property to ‘Rollup’.
Step 3: Add Relational Property
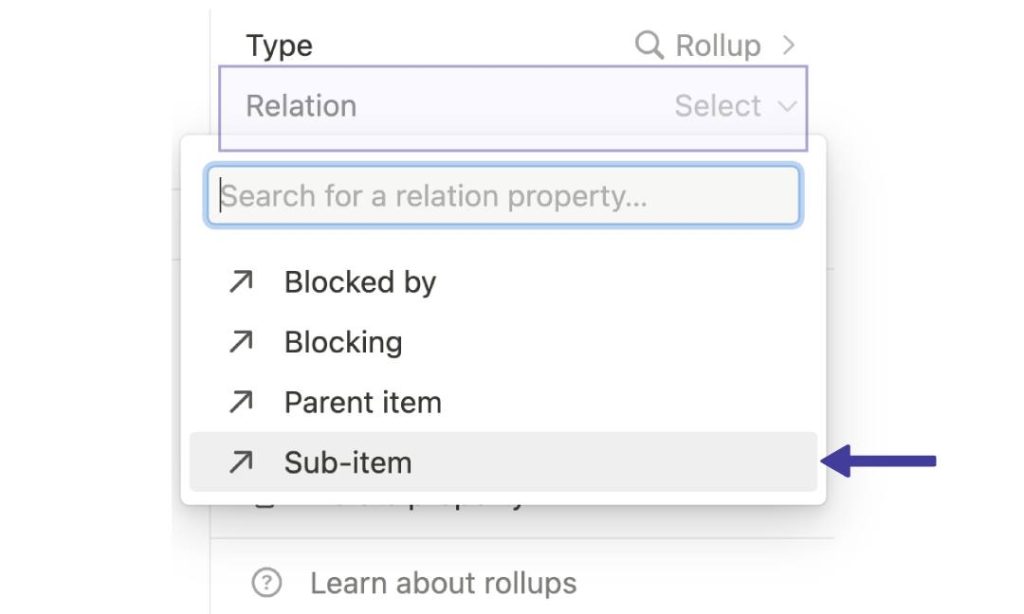
Still hanging out in the ‘Progress’ column? Great!
Now, choose ‘Subitems’ as the Relation Property. This lets you keep tabs on all the subtasks that fall under the main task you’re working on.
Step 4: Tie the Progress Bar To A Property
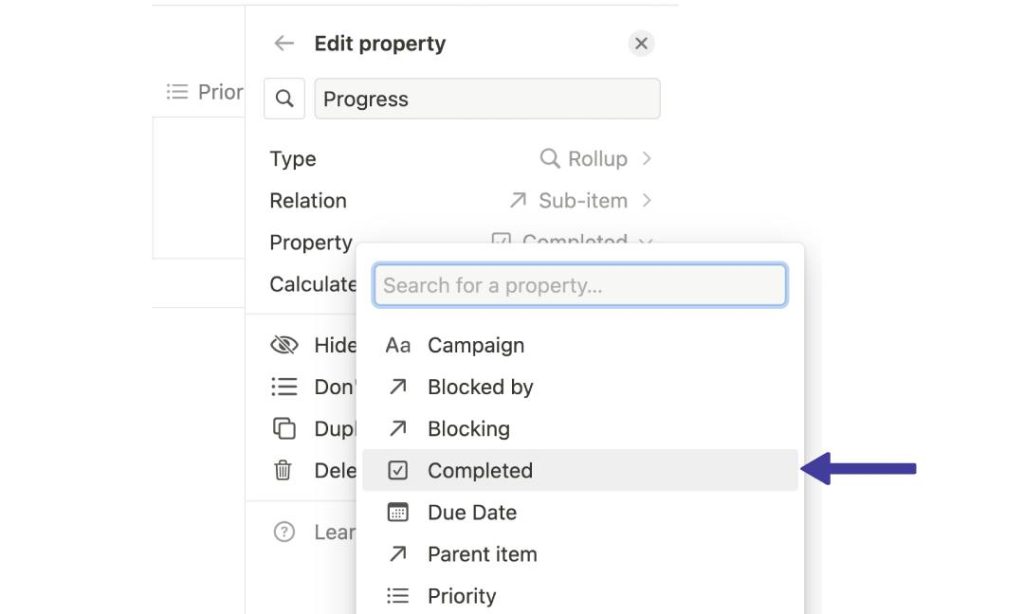
In this step, you’ll want to go under ‘Property’ and select ‘Completed’.
This action will make the column look up the ‘Completed’ checkbox to see if a subtask is done or not.
Step 5: Calculate Subtask Progress
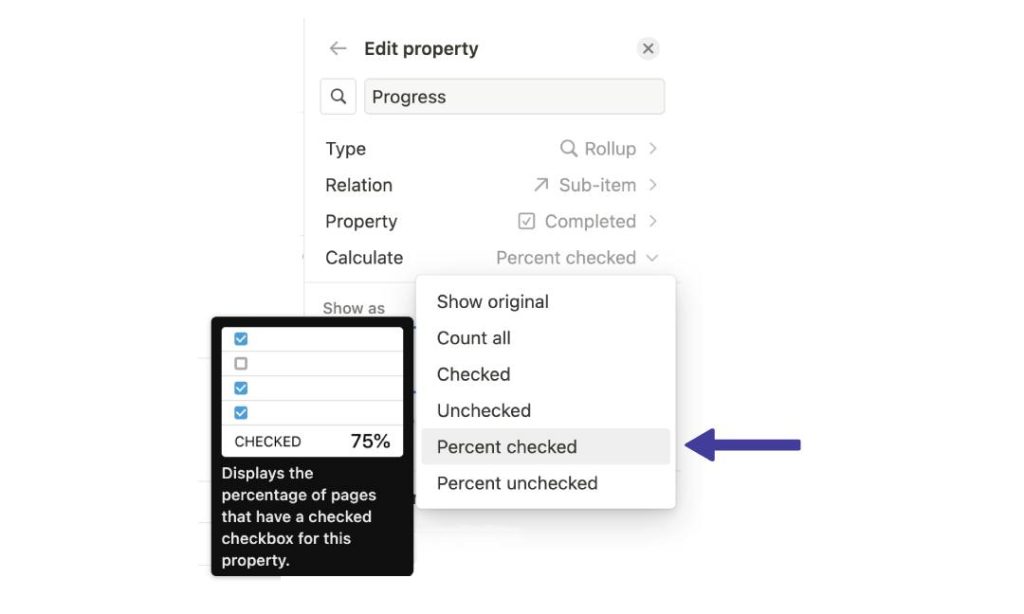
Now, under ‘Calculate,’ go ahead and pick ‘Percent Checked‘.
This will do the math for you and figure out what percentage of the subtasks have been completed.
Step 6: Add Visuals
Last but not least, let’s make it look good. Choose to show the progress as a ‘Bar’.
Feel free to play around with the color too, and if you’re like me, you might also want to display the % percentage complete for a clearer picture of your progress.
Wrapping Things Up
You’ve just navigated the ins and outs of Notion subtasks, and I bet you’re ready to tackle your to-do list like a pro.
Whether it’s project milestones or daily tasks, these subtasks are your new best friend for staying organized. And let’s not forget that progress bar—it’s not just eye candy; it’s a real helper.
Time to roll up those sleeves and get things done!
Before writing an article, we carefully research each topic and only share information from reputable sources and trusted publications. Here is a list of the sources used in this article: